

Animal Crossing: Wild World was one of my favorite games when the Nintendo DS was a popular video game console. When the Pocket Camp came to the App Store I couldn’t believe they made a version for mobile devices. Remembering the great times I spent with this title a few years ago, I just couldn’t miss the opportunity to spend some time with it now.
When I started playing I saw how some simple tasks within the game took a lot of tap-time, but who cares — it’s Animal Crossing right? I decided not to get into it in the beginning but play, and see if after a longer period of time the small glitches within the UI would distract me or if I could go along with them.
Now being a level 50 player, I suppose I’m allowed to linger a bit. Let’s jump straight to interface solutions which were, and still are, frustrating for me since the very beginning:
1. Shovelstrike Quarry Help
When you get into Shovelstrike Quarry screen, you will see, that you need to receive five “Helping Hands” from your friends in order not to pay for an entrance. After clicking the button, another screen will appear with the list of all your friends sorted by activity date (with the most active on top). What you need to do next is to tap on a friend button, then you will get a pop-up message if you wish to ask this person for help; all you need to do is accept or decline. When you click “Yes, please” you will get a second pop-up message which is a confirmation of your decision and also needs your approval. However, you must repeat those last steps every single time you wish to ask another player for help. It’s not an issue if you need to ask two or three people, but when you know that you need to ask at least ten of them to receive the help the same day — it is annoying.
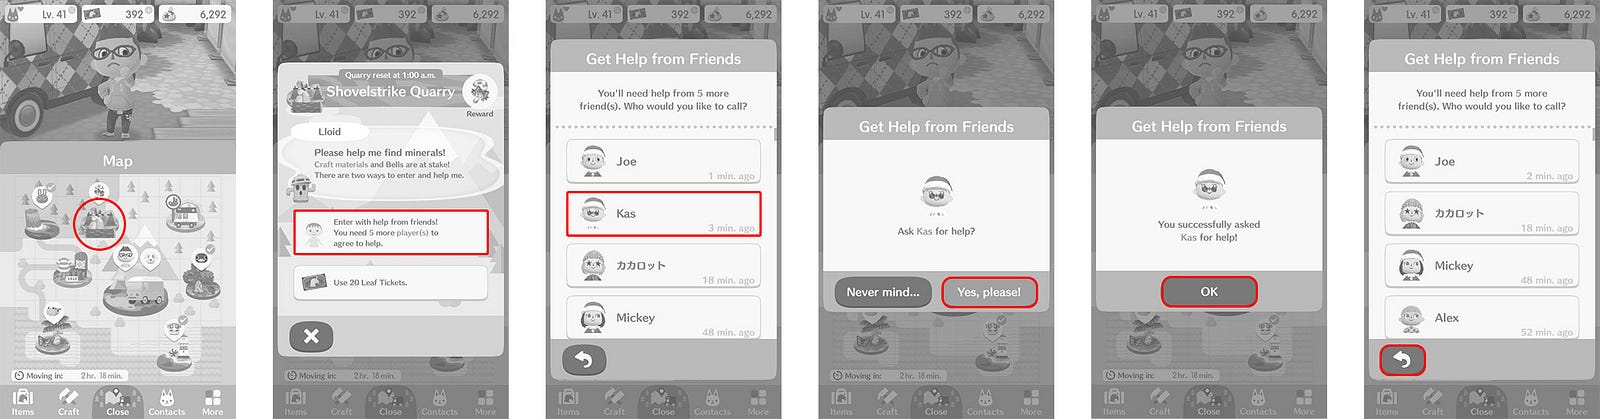
Shovelstrike Quarry Help — current path.
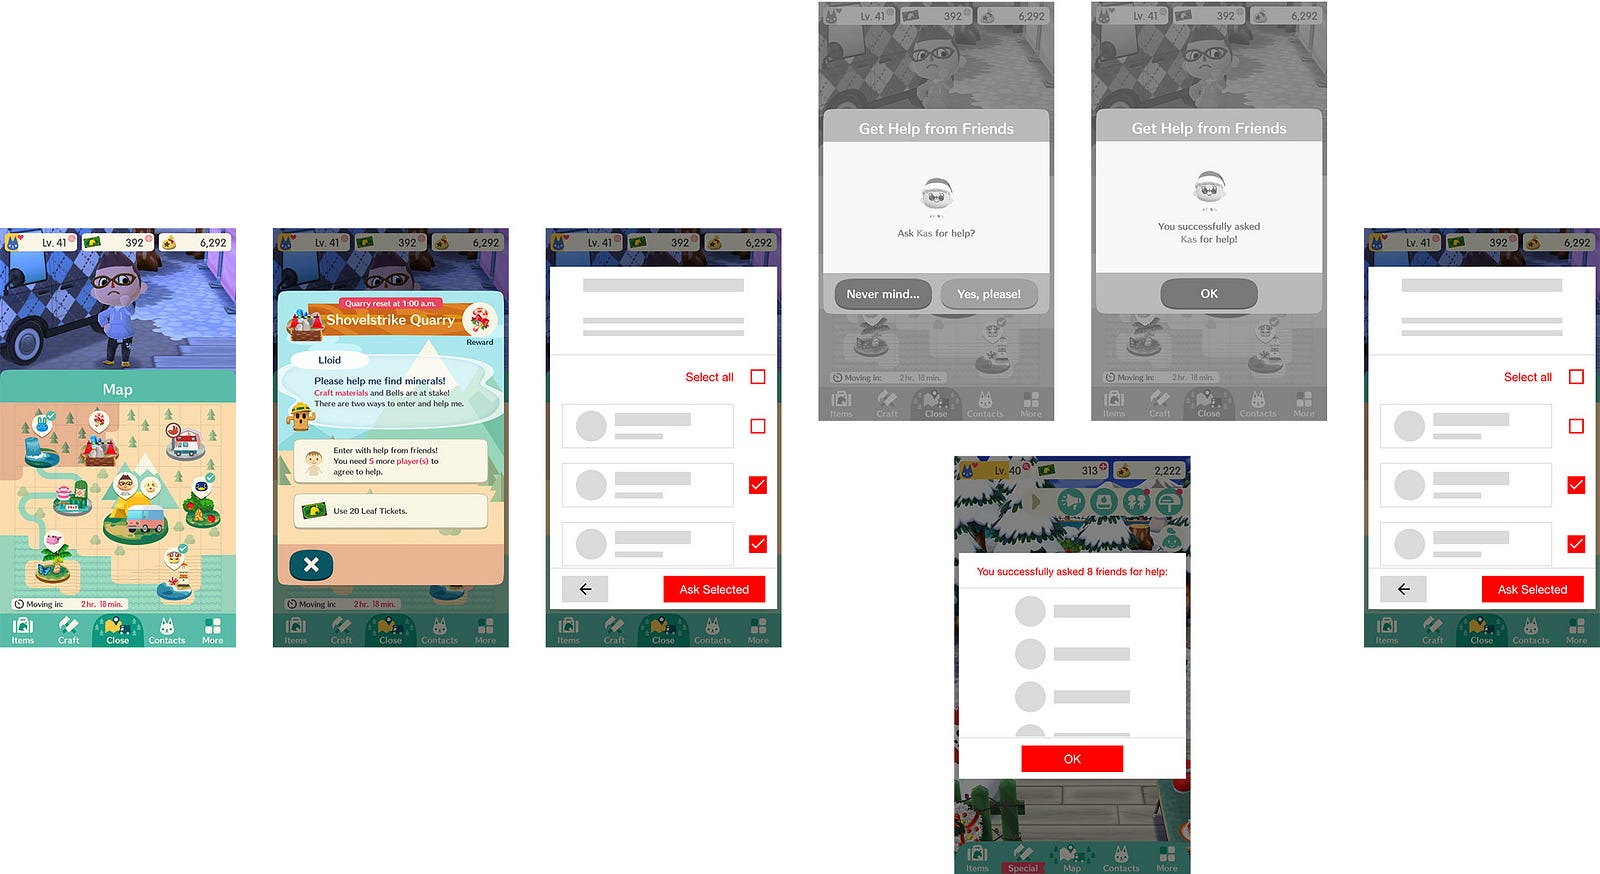
Shovelstrike Quarry Help — change idea.
I analyzed what I would like to receive in the upcoming update, and I came up with a simple solution — I would add checkboxes next to friend’s names. This way there is a possibility to select multiple (or all) friends at once, and still maintain the option to tap on just one. It’s just one step less when you ask for help from one person, but you can easily calculate how many steps you are saving when you need to send multiple requests.
2. Receiving Friendship Invitations
This is as big of an issue because you will probably not use this functionality as often as other two described in this article, nevertheless, this is one good example of what I think went wrong during the design process. Let me show you what you need to do to accept an invitation.
First, you will receive a notification as a glowing hamburger icon with a pink circle badge on the main game screen. When you click the icon, more options will be uncovered. The one which interests you will be the second on the right (with two people silhouettes). When you tap it, you will see the standard friends option pop-up screen. Normally there is an “Add friend” button, but when you receive an invitation, it gets an additional text, “You’ve received a friend request!” It doesn’t matter if you got an invitation or not, this button, either way, will get you to the same “Add friend” screen. The only difference is a small badge icon on the “Friend requests received” button. Clicking it will get you to the most important (at this point) screen with new requests. Do you see what you need to do next? As in the previous example, you need to tap the request to get three options on a next screen, which are “Deny”, “Never mind…” and “Add friend!”. When you accept the request you will get a notification which also needs your approval. You will be forced to repeat those steps in order to accept every single request. After that, there are another three taps to get back to your home screen. This is more painful than the first example.

Receiving Friendship Invitations — current path.
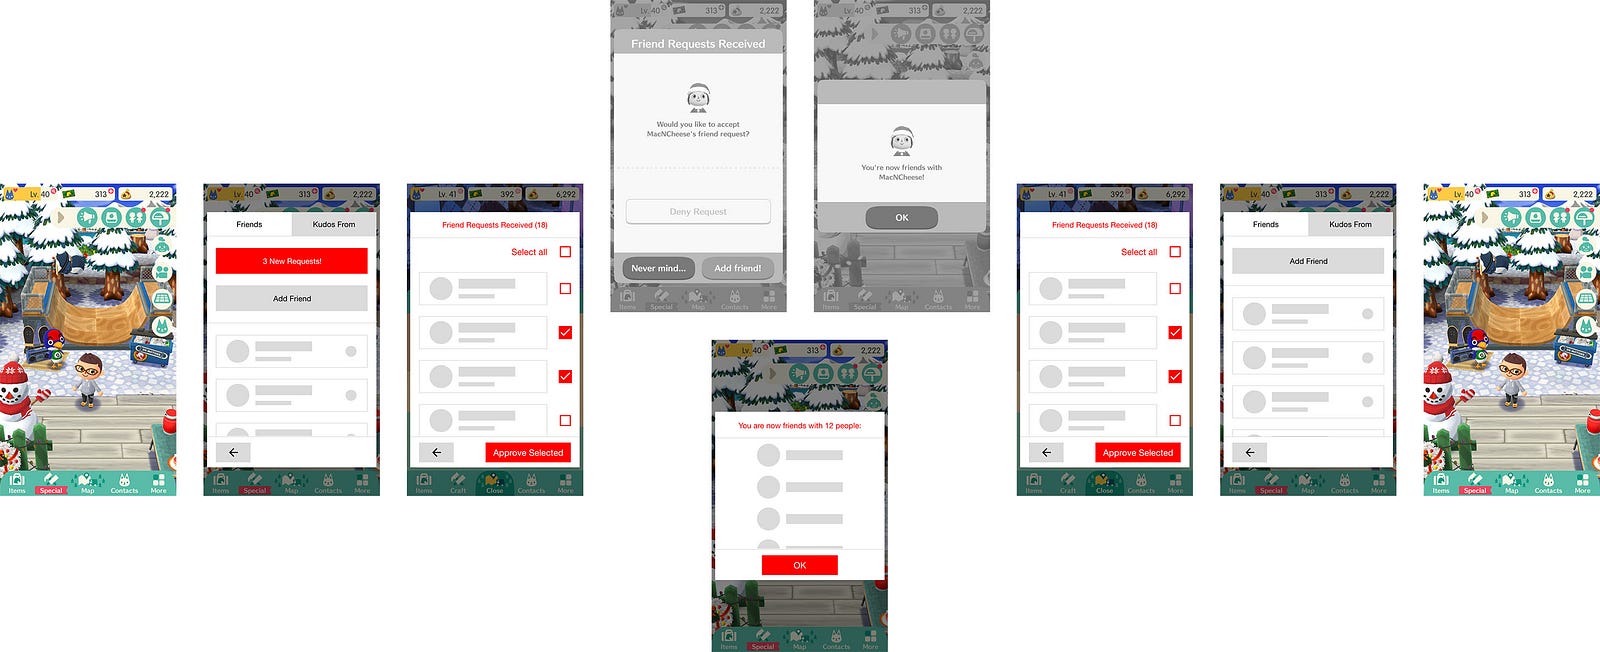
Receiving Friendship Invitations — change idea.
What are my thoughts? First of all, I would like to see an additional button with only requests, which would take me directly to the requests list, skipping the “Add friend” screen. In the requests list, I would use the solution from the previous example; I would add the checkboxes next to the friends’ names. I don’t know the analytics of the game (and I don’t think I will ever see them), but if I apply the assumption that most users accept invitations to gain more friends (this is based on multiple websites and comments sections under the game reviews, where all share their ID numbers to gain more friends), there is no need on this screen for “Deny selected requests”. If the analytics data would support this approach, accepting multiple requests would be a pleasure. After the approval, there would be just one tap to get back to the game home screen.
3. Friend Listing buying process
There are two ways to buy something from your friends. The first option is that you need to find a friend (or a stranger) within your map/world and engage them. Then you choose the “View Market Box” option, which will show you a screen with items you are able to buy by just taping on one. Simple and very convenient.
The second option is more complicated. You need to tap the hamburger menu and select… “Friends list”. A friend’s name (which is also a button), has the icon on the right which is a representation of at least one item in your friend’s Market Box. After the tap, you will see a screen with items (only four of them for some reason), “Player setting” and “Visit Player” buttons. The thing is, you are not able to buy anything from this view. You need to tap “Visit Player”, then talk to the avatar, then tap the “View Market Box” option which will show you a screen with items you are able to buy by just taping on a chosen one. There is not only a lack of the possibility to see all of the player’s listings before you visit and talk to the avatar, but you are also not able to buy anything from this view; and it’s not the end. Let’s say that the player you visited has no items you’d like to buy. You tap the icon which will bring you back home, but you are forced to repeat all steps from the beginning to see what other players are selling. Maybe I spent too much time during the last two years solving e-commerce problems, but I think Market Box is an important part of this game and should get more attention.

Friend Listing buying process — current path.
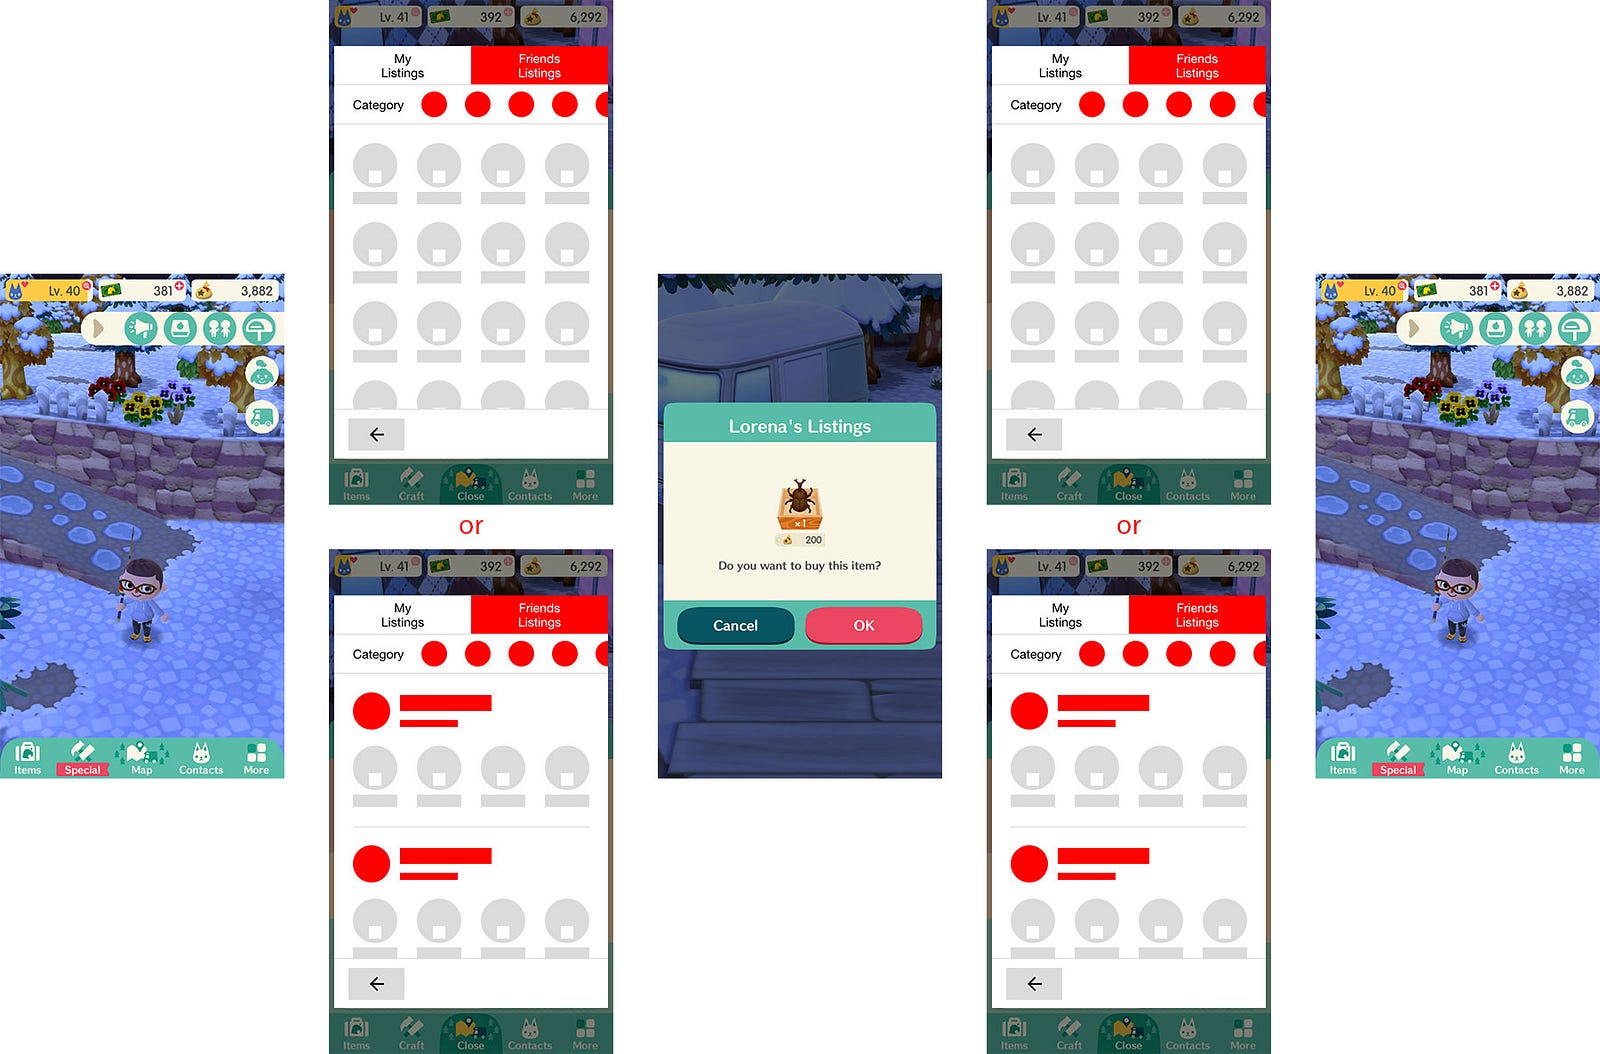
Friend Listing buying process — change idea.
What I think would help is to put the “Friends Listings” next to the “My Listings” screen (as an additional tab). With this approach, we would be able to focus our attention on the items with a possibility to sort between categories, for example, Fruits, Fishes, Insects, etc (just like it works for “Items” and “Craft” screens). This way you could find and buy what you need with so much less effort. With this method, it would be possible to add a player name on a buy/cancel screen, so you would know from which player you are buying the item.
This screen may be easily adapted as well. You can have a listing of all the items from all your friends showed at once or with all friends with specific items (this way you would be able to buy from a player you wish to because you like him/her more or for another reason, if that would matter).
That’s all at this point. Will I continue to play this game? For sure — Nintendo is constantly updating the game with new functionality, options, and characters, and I’m curious to see if they will make some improvements to the game interface.
At the end I have just one question for you:


